TONI MCCARTHY DESIGNS
  • Home
  • Necklaces
  • Earrings
  • Bracelets
  • My Muses
  • How I Do Things/Events/Contact
    • Events & Galleries
    • Contact
  • BLOG: Courting My Beading Muse
  • Look Book
  • Home
  • Necklaces
  • Earrings
  • Bracelets
  • My Muses
  • How I Do Things/Events/Contact
    • Events & Galleries
    • Contact
  • BLOG: Courting My Beading Muse
  • Look Book
Search
Picture
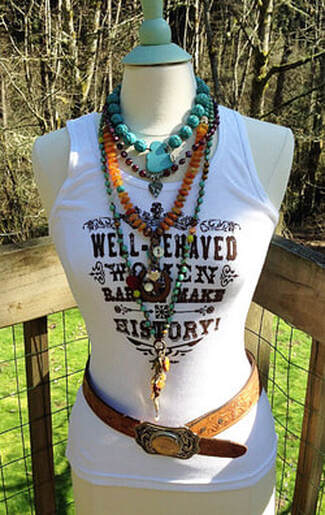
Meet ANNIE, my muse.  I photographed her on a sunny February day on our deck just up from the woods.  She's sporting a tank, a my husband's tooled leather belt , a big silver buckle that my dad used to wear, and lots of new "cowgirl"-style jewelry.  She's looks pretty good, right?

It all started with my "need" for a figure like hers to be the stage for the new western-themed jewelry I had in my head.  Once she arrived, Annie seemed the right name (just enough sass), but she needed some clothing.  Well, lo and behold, I found the perfect garment on Junk Gypsies website:  "Well-Behaved Women Rarely Make History"--one of my favorite sayings.  

Well, ever since I partnered up with Annie, my full-size (although headless and legless) jewelry model, I have found a wealth of jewelry ideas that just keep coming.

This is one of my FIRST BLOG POSTS from 2013. Several of my original posts are available below.  Enjoy them.  Things have changed, and I will add and update things soon.

Courting My Beading Muse

I think about beads, metals, and jewelry a lot.  
Maybe not constantly, but almost.  
So when my muse is with me, I must court her so she stays
and provides me with inspiration.  

Project #2:  Tie One On/Men's Up-Cycled Neckties

3/28/2020

1 Comment

 
This was originally going to be my first sewing project, but then I found all that thrift shop denim, took a detour, and went off on another tangent.  That adventure is the post just below this one.

​So, how this began is with a project by Kim Montagnese (It's Sew Easy) called "Necktie Upcycle" that I found on-line.  In her project she attaches a necktie skirt to a vest, but she uses about 15 silk neckties.  I didn't have that many, but I did have the collection from my sons' high school fancy dances and events.  I'd, of course, kept them lo these many years for something, as we do.  So I deconstructed them and learned a ton about how they are made.  Pressed them, sewed them together using both pointed ends and alternating them, and fashioned a skirt to attach to my closet raid, a black waffle-weave vest from years ago.  

I removed the vest zipper (just snip-snip, no problem at all with weird edges), then gathered the length of tie-skirting to fit the vest hem, and hand-stitched it on the inside of the hem so it would lay flatter.  Then I put the whole thing on Annie, my muse, stepped away, and saw right away that it needed something else.  After I ran it by my friend Shawn through a flurry of text photos,  she suggested something was needed to "funk it up" like another tie point going the other way.  Luckily I did have one extra tie so I cut it up, gathered it, and sewed it to the bottom front.  Equally luckily, I had leftover bias strip from the same tie, so I bound the right front and collar.  Much better.

​All in all I spent several days between this project and making jewelry.  On to the next one.
Picture
1 Comment

Project #1:  From Thrift-Store Denim to Finished Dress

3/21/2020

0 Comments

 
Originally I planned my first sewing project to be a remodel of a denim jacket already in my wardrobe.  However, after I accumulated a stack of denim pieces from my local thrift stores, that plan changed.  Once I started "cannibalizing" those jackets and skirts, I discovered that one of the remaining carcasses was a perfectly good vest.  OK, so detour.  This post will show you how it came about.


Picture
Picture
Here is the vest that "appeared" when the sleeves were removed.  I like the dark wash and the sparkly  embellishments on the yoke, both front and back.

Picture
I trimmed and measured the cut-off sleeves from this original jacket and one other to fit the hem of the vest.  There is some overlap, making kind of a kick-pleat situation.  I tried to match up seams as best I could, just for overall continuity.

There was some difference in denim color, but I like that.  

Picture
The finished piece!  I used zippers from another jacket to overlay the front area where the skirt attaches.  I looks way better with this trim.  I also made bias trim for the armholes from a batik-print men's shirt, using the "wrong" side of the shirt back fabric.  You'll also see a tab on each side of the back at the hips made of the same fabric.  

Of course, I used some new jewelry to accessorize the dress.  And since I love layering, this denim garment will most likely be worn in my favorite look--a long-sleeved swing dress.  Black looks best (to me) with this dress, and I have several in this style to layer with other pieces in my wardrobe.  I get them on Amazon--they are perfect for this purpose.

Picture
The back--couldn't leave well enough alone--had to be embellished.  You have to look good both coming and going.

I cut a pocket out of a star-printed denim skirt which coordinates well with the armhole trim.  

The patch at the neckline is from Secret Lentil--scraps from her original clothing that I purchased at her website.  Then I sewed on two buttons for texture.  Love the contrast in color here.

Picture
Added a flowing oyster-color scarf along with the jewelry--my long necklace featuring a soft-solder pendant on textured, matte copper chain.  The jewelry coordinates well in color with the patch on the back.  I pick up details like that to tease the eye and enhance the interest.  You never know, I might want to twirl while wearing this!

Hope you enjoy seeing the steps I took over several days to create this piece.  Again, my inspiration is Wayward Threads . . . by Lorri Scott.  I've described this book in earlier posts.

0 Comments

My Favorite Up-Cycling/Repurposing Reads

3/11/2020

0 Comments

 
I just acquired Wayward Threads: Techniques and Ideas for Upcycling Unloved or Discarded Garments by Lorri Scott, and it's my favorite so far--kind of a bible for upcycling clothing (in the styles I love and easy-sew).  As you may have read in my post from a few days ago, this book has changed my direction about projects I want to concentrate on for a little while.  I need to sew!  And when I finish a few remodels, I will design jewelry for each one.  
​
​But I have a few more, oldies but goodies, that I pulled from my library shelf and dusted off (they have been there since they were brand new) to reread.  And they each have something to offer to the art of remodeling clothing.  Plus they're all still currently available on Amazon for low prices.  See the links below to order them.
•  Sew Vintage: New Creations from Found Fabrics by Jennie Archer Atwood (2002)
My favorite chapter, "Embellishing Vintage Textiles", covers tips and tricks for using lace and appliques that I plan to use when I cut up old garments, yardage, or trims and insert them into pockets or hems.
•  New From Old: How to Transform and Customize Your Clothes by Jayne Emerson (2006)
I always love Before and After projects.  This book shows the old, original garment (like an old leather skirt) and then the transformation into the new leather bag.  One chapter at the end called "Making Things" has drawings and directions for lots of the garments or accessories in earlier chapters.

With books like these, some simple patterns that are easily adjusted for new looks, and a healthy stash of garments to change up, I'm ready to use the next few months at home to create new one-of-a-kind pieces to show off. Can't wait!

0 Comments

Closet Shopping . . . and My First Field Trips

3/11/2020

0 Comments

 
So here is what I layered in that box of garments that came out of my closet.  Step one was shopping there, taking likely candidates off hangers, and putting them aside.  Like brainstorming . . . but with clothes.  Everything was acceptable, no editing.  That will come later after I've accumulated the other materials from my field trips to thrift shops.  
Picture
These photos show you what I found in a couple visits to thrift stores.  Again, brainstorming, no editing.
​
Picture
Picture
Picture
Today I am off for my last thrifting trip.  Hoping to find what I need to start my first project:  Denim Jacket Remodel.  
0 Comments

I Miss Sewing . . . I'm Going to Make Something

3/10/2020

1 Comment

 
So it all began when I ordered a book from Amazon called Wayward Threads Techniques and Ideas for Upcycling Unloved or Discarded Garments by Lorri Scott.  She upcycles vintage fabric and clothing into new, one-of-a-kind garments.  Right up my alley--I love to repurpose, and I'm totally enamored with the idea of anything that is one-of-a-kind.  I read the book cover to cover the day it arrived; then I read it again.  I was so inspired that I went shopping in my closet for up-cycling possibilities and soon I had a box of vests, shirts, and jackets--once so loved, now so last week.  I needed a plan.

Even though I've sewn since I was a kid and made all my own clothes (and my sons' till it was no longer "cool"--if it ever was),  I haven't done much more than repair lately.  And I hate doing that.  I have a sewing machine (my mom's basic Sears model--all I need), a sewing table (repurposed from my packaging/shipping area--now moved), and that stack of stuff from my closet.  It was calling to me.

So a field trip to thrift stores was in order this week.  I found lots of things that I put into the "remodeling supplies" box: natural fiber vintage tablecloths and yardage, men's Hawaiian shirts in wowza graphic prints, and a variety of jackets that will be cannibalized for pockets, yokes, cuffs, trims, etc.  Plus some miscellaneous small doilies, tassels, and lace.  You never know what you'll need till you need it.

So after re-reading the book, I've decided that my first project will be a Denim Jacket Facelift. I still need a few things before I actually start cutting, pinning, and stitching.  Look soon for the next chapter.
1 Comment

My Studio Work Space (first published 2013)

2/10/2020

0 Comments

 
Picture
Picture
Just this week I "remodeled" my work space.  (I've really been into the new looks, updates, fresh starts this year so far--no guarantees on how long this phase will last, however.)  But this is where I work.

Organization and efficient storage are the keys to my being able to work creatively. It will always nag at me if I have a chore to complete before I sit down to have fun.  And beading is way beyond fun for me.  It's when my muse sits nearby, maybe on my shoulder, and gives me artistic encouragement and inspiration.  Hence, the remodel . . . and on to courting the muse!

First a little history:  My studio is a big room in our basement that used to be the rec room when the kids were little and played down there.  Years went by and the room became a store room for furniture, athletic equipment, you know, an easy place to stash whatever. Then one day I thought that I wanted to move from a small spare bedroom upstairs to this luxurious space that wasn't being utilized to its full potential.  It's big (about 18 x 30 feet), carpeted, and completely comfortable, and I am really appreciative of it. So I carried all my beading stuff down the stairs piece by piece (and of course did a thorough purging of the accumulated goods to better homes.) The arrangement has gone through several redos over the years, but I'm really happy with it now.  We plan to move the pool table out later (right now it's a staging area) and put in a large wooden dining-style table (now living in the garage) for display, work, bead retreats, and classes.  It's always something . . . 

The photo on the right shows where the magic happens, so to speak.  There are two six-foot tables, one under the windows and one to the right forming a corner.  The table you see is the actual workspace; the other table holds stuff.  The cool thing is my storage on the table.  I ordered two shelf units from Amazon (the kind that are used in schools as mailboxes or paper storage).  I assembled them, put them on the table, and proceeded to fill up the 72 cubbies.  Since most of my beads and findings are stored in plastic divided boxes, the fit is perfect!  And . . . everything I use all the time is with reach.  My husband is going to build one for the other table that is a more custom size.  I'm sure I can find things to fill up those cubbies too.  

But the best thing is that I'm no longer working in a one-foot-square space.  In the past I've always somehow ended up doing that by surrounding myself with beads, boxes, books, tools, articles, etc. until I have almost no room left to work.  So, right now at least, I have the whole length of the table to work on a project.  No guarantees, but for this week, it's working!

The photo to the left above is my tool table.  It's a steel garage or workshop metal shelf from Costco, so it's beefy.  I have three of these altogether.  The other two are for other purposes.  But this one is where I keep my hammers, mandrels, bench blocks, stamps, cutting tools, dapping tools--anything that really requires some pounding.  The shelf below is storage for tools used less often.  The wooden section on top is a leftover from my mishmash of earlier storage shelves.  It's about four feet long and about nine inches wide.  It's perfect for the little things that need to be corralled or they fall off or get lost.  I have the stamps, hole punches, scale, dapping blocks, glues and other solutions there.  And it's open underneath so that tools with longer handles can be tucked there and still be found easily.

Those are my two main work areas.  I sometimes go downstairs and just look at it.  Do you ever do that?  I'll do the same thing after I've made a piece that I really, really like.  Just make a trip to look at it.  It's somehow satisfying.

​
0 Comments

Destashing:  The art of Finally Letting Go (first published 2013)

2/10/2020

1 Comment


I first published this in 2013 (slightly adjusted for 2020) on my first CMBM blog on my Beads & Threads website:
I love destashing.  It gives me another chance to discover things I thought I'd lost, to reorganize, and to get ready to find new homes for those little babies I've been hoarding for way too long.  I loved them in the beginning, but today my styles have changed just enough that I don't use the same beads and findings.  But somebody can!  And I have way too much stuff!  (Is there such a thing where beads are concerned?)


I do most of my shopping on-line at favorite "stores."  Thus I have accumulated some items that perhaps were not what I thought they would be.  Have you ever bought way too many of the perfect bead and when it arrived it was NOT the chartreuse you thought, but lime green?  In the destash basket.  How about those clasps that are way cheaper when you buy a dozen, but you only ever used eight?  The orange daggers that "came in" sets of five strands, but you only need three? In the destash basket.  Or the chrome seed beads that are perfect for spacers, but you had no idea how much a quarter kilo amounted to?   In the destash basket.  

I do several DeStash Events throughout the year, so I periodically update my DS baskets and trays.  Up through 2019, I attended the Portland Bead Society Beach Retreat in Cannon Beach OR.  I'd get ready for days for the bead retreat where 75 women gathered to bead, take classes, learn from each other by watching and informal chats, and eat.  Lots of the latter. But many of us brought things to "liquidate", shall I say, so if we sold something we often bring home other people's treasures too.

The energy is AMAZING for that weekend.  I'd always take bead projects and spread out my tools, beads, findings, and light, but I'd get so distracted.   I'd make a few things but I found myself wandering around the room several times per day to see what was being designed, invented, tweaked, auditioned, mulled over.  Mostly the latter.  And see what other people are liquidating. . . I wouldn't want my stash to get too small, after all.
1 Comment
    About Me . . . 
    I am a beader, a designer, and a maker. And . . .

    I love it. . . all parts of it: planning projects; buying beads and metal; accumulating tools; reading everything;  organizing my studio; auditioning designs; researching other artists; collaborating in creative groups; working on my website and social media; and hopefully inspiring myself to continue courting my beading muse. 

    I have been designing and making handmade jewelry since about 1995,  and always my focus has been on What Women Buy for Themselves  (although I have LOTS of customers who are men too!)

    My two "styles" are BOHO (mainly glass/gemstone beads in chunky designs) and MOJO (metal, chains, clays, and more in neutral designs). However, my styles have evolved throughout the years.


    All pieces are designed and made by me in my studio here in Camas, Washington.
    Czech glass in bold colors is one of my main "fabrics."  In addition, metals play a huge part in my designs.  Copper, brass, silver, gemstones, pearls, vintage glass, handmade lamp work beads, and wirework are mixed with metals, gemstones, pearls and found objects in one-of-a-kind designs.

    Disclosure of Material Connection: Some or all of the links in my blog posts are affiliate links.  This means if you click on the link and purchase the item, we will receive an affiliate commission and we are disclosing this in accordance with the Federal Trade Commission’s 16 CFR, Part 255: Guides Concerning the Use of Endorsements and Testimonials in Advertising.  As always, our heart is to encourage you to use what you already have and, when we suggest products, we only share supplies that we use and endorse.  

    Categories

    All
    2013 Posts
    My Studio

    RSS Feed

A Toni McCarthy Production

What Women Buy For Themselves . . . since 1995
​
dba Beads & Threads

www.tonimccarthy.com
Camas, Washington USA
  • Home
  • Necklaces
  • Earrings
  • Bracelets
  • My Muses
  • How I Do Things/Events/Contact
    • Events & Galleries
    • Contact
  • BLOG: Courting My Beading Muse
  • Look Book